
Updating Old Fireplace Doors The Easy Way!
#The Setup My house has some interior features that needed to be replace or updated, one of which was the ugly, stained brass fireplace doors for the wood-burning fireplace in the living room.
My previous house also had brass fireplace doors, and being less DIY-savvy at the time, I spent $250 or so at a home improvement store on new matte black fireplace doors. In my defense, the old doors had started to sag and separate a bit, and the new doors did look nice. But hey, that’s a few hundred dollars I could have done something else with!
Thanks to a handy tip from my sister, I decided to forego spending another $250 on a new set of doors and instead refinish the old ones myself. These doors were also in better shape, opening and closing freely and with only a couple tiny dents on them.
#What I Used
- Fine-grained sandpaper
- Liquid deglosser
- Old rag
- Painter’s tape
- High-heat spray paint
#Before
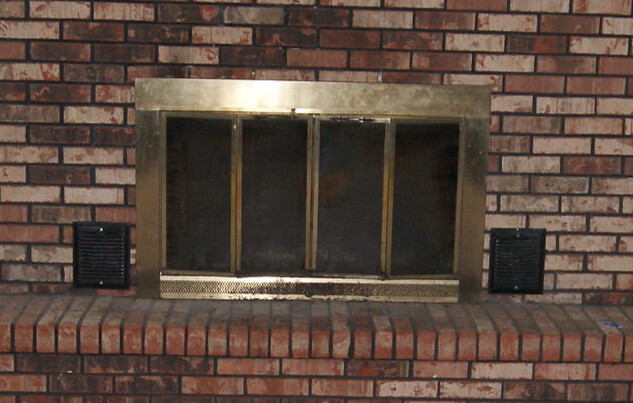 Not the prettiest thing in the world.
#Remove It Fireplace doors are a lot easier to remove than you might originally expect. Typically, there are a pair of bolts on the top inside that secure the doors to the fireplace itself. Open the doors, lean into the fireplace, look up and to the left and right, and they should be right there. If the bolts won’t turn, try using a wrench or pliers to give yourself some extra leverage. Loosen those bolts and the doors should come right out. It can be a bit messy, so wear gloves and/or clothes that can get dirty. Make note of where the insulation is positioned around the edges of the frame, as there’s a good chance it will shift or fall out as you are moving whole thing around.
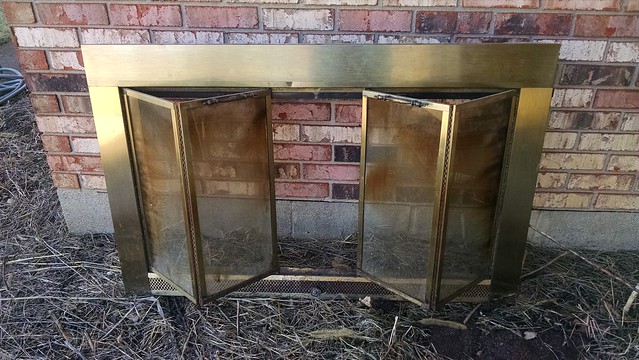 The fireplace doors removed and taken outside. Notice the staining on the glass. Believe it or not, that will scrub right off!
#Take it Outside Take the whole thing outside. Remove the doors themselves from the assembly. Mine had a small clip in the upper corners that when depressed should allow the doors to slide out.
Lightly sand all the visible surfaces on both the frame and the doors with fine-grained sandpaper. Next, put some liquid deglosser on a rag and wipe down everything that was just sanded and let it dry for about 10 minutes.
While everything is drying, carefully tape over all the glass on the exterior of the doors with the painter’s tape. You’ll only be painting the outside, so no need to tape the inside.
Once the glass is completely taped, shake up the can of spray paint and start spraying. Err on the side of several light coats rather than one heavy coat to avoid runny paint. Wait 10-15 minutes between coats. One can of spray paint was just enough to cover the frame and the doors with three coats. I let everything dry for a few hours before removing the painter’s tape from the glass.
#Scrub the Doors The inside of the glass looked terrible, and honestly, I expected them to be permanently stained. Nevertheless, I sprayed them with glass cleaner and tried scrubbing them down with a coarse sponge. To my surprise, after a couple applications, all the grime came off and the glass looked as good as new!
#Put It Back Together With everything dry and the glass clean, I took the frame back inside and re-secured it to the fireplace. Make sure any insulation that may have shifted or fallen out in the process is back in place. The frame is much lighter without the doors, so I found it easier to put the frame back first and then put the doors back in one at a time.
#Final Results
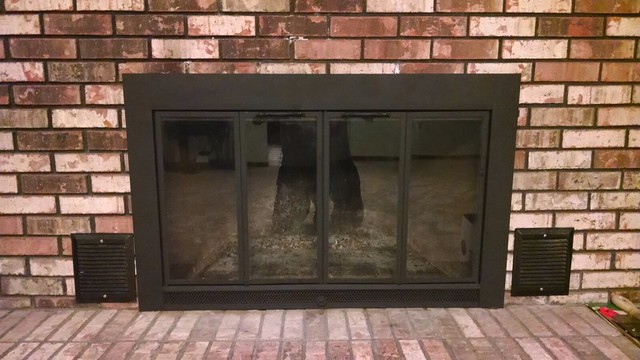 Not too bad for a couple hours of work and less than $20 in materials!