
How I Bike to Work: A Basic Commuter Cycling Setup
May was National Bike Month. I fully intended to write this post last month, but it turns out I’m lazy. One would think the set of people who bike to work regularly and the set of people who are lazy would have a very small intersection (and one would probably be right), but apparently there is room in that intersection for me. The following is an overview of the bicycling gear I currently use to commute to/from work, run errands, and generally get around town. Any products linked to are items I actually own, have used personally, or have friends who own and recommend them.
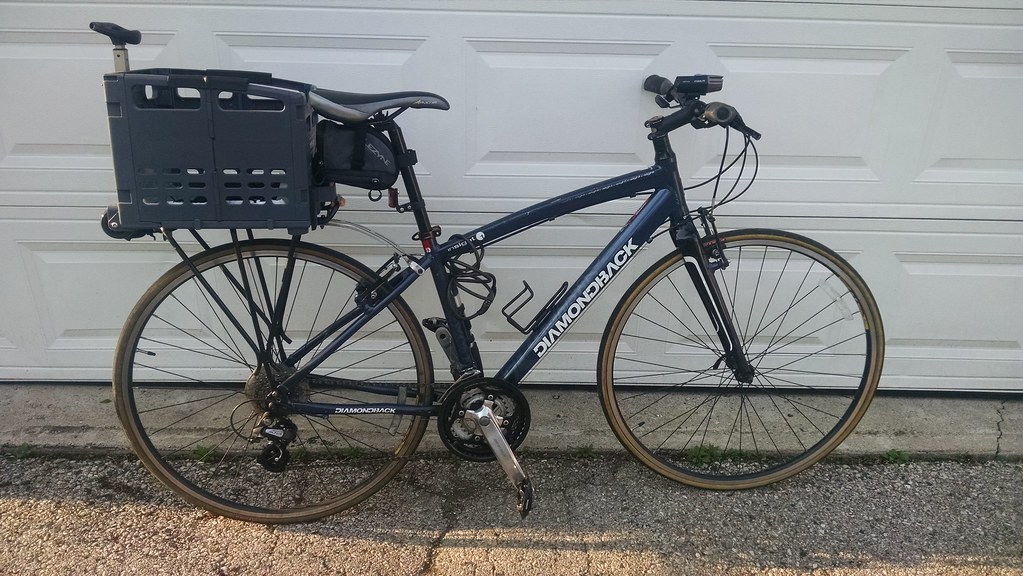
To kick things off, here is a picture of my current bicycle and gear:
The Bike Itself
It’s a 2008 or 2009 Diamondback Insight 1, which is an entry level hybrid. I believe it retailed for ~$400 at Performance Bike, and I bought it on Craigslist from a guy who was moving for ~$200 in 2012. I like it because it has a bit more aggressive profile than many hybrids (i.e. the handlebars are more or less in line with the seat, rather than raised above them), and it’s not so expensive that I worry about riding in the rain or it being stolen.
I initially started commuting on a $75 mountain bike from Walmart. Going from the Walmart bike to the Diamondback made a huge difference. There are plenty of higher quality bikes out there than what I have, but whatever you do, avoid the extremely low cost department store bikes. You won’t regret it.
You should be able to find a solid entry level bike at your local bike shop for about $400 new, maybe even less if you happen to catch a sale or buy a model from the previous year. Another advantage to going to your local bike shop is they can help you determine the right fit and style to best meet your needs. As an added bonus, they will often include several free tune-ups and adjustments make sure your everything is in good working order as you get started.
If you watch your local Craigslist, you should be able to find an even better deal on a used bike. Using the advanced search features to filter out listings you are not interested in should make the volume much easier to deal with. You may even have some success looking at garage sales, but you will need to be more adept at quickly identifying a good quality model if you go this route.
If you prefer to buy online, I have heard good things about Nashbar but have not actually bought anything from them. Personally, unless you are absolutely sure what you want, I would recommend buying something that you can test ride first.
Carrying Gear
If you are commuting or running errands, you are going to need a way to efficiently transport items with you. There are a number of options. The simplest is to grab an existing backpack or messenger bag and put everything you need in there—no extra equipment necessary. Nevertheless, unless you are riding in a very temperate, flat, non-humid environment, wearing a backpack around will make your back sweat quite a bit. Also, depending on how heavy the gear is, it can become uncomfortable to have it connected to your back/shoulders.
Get a Rack
For both of these reasons, I’ve opted to use a rack in various ways to help transport gear. Once you have a bike, a rack is probably the next most important thing to get, as it will give you a variety of options for carrying around various stuff. I have a Topeak Explorer. The price tends to fluctuate quite a bit, but I was able to get mine for ~$27. You can probably find a cheaper rack than this particular model, but mine has held up well and the MTX QuickTrack system makes it easy to securely attach compatible bags or baskets.
Add Panniers
I started off with a set of cheap panniers, which are a set of bags or boxes that attach to the top/sides of the rack. You can find many different options in your local bike shop or online. Because I went cheap, my panniers started to fall apart after a few months of heavy use. They were also not as convenient to use because they did not take advantage of the quick connect and release MTX tracks on the rack.
Next, I went super-DIY and made my own panniers out of a pair of old messenger bags (think the giveaway/promo bags that are often handed out at conferences) and connected them to the rack using carabiners. These actually served me remarkably well and I used them for several years. The carabiners made it very easy to detach one or both bags to take with me. Perhaps I’ll go into more detail on these in a future post.
Or a Basket
Recently, I received a Topeak Trolley Tote Folding Basket as a gift. As a result, I retired the DIY panniers. They were fairly beat up by this point, and they also get dirty from sitting so close to the wheel and the ground.
The basket is nice because it attaches securely using the MTX tracks and is large enough that a fully-stuffed backpack fits inside it. This makes packing trivial because I know if it fits in the backpack, it will fit in the basket, whereas sometimes I had to get creative with packing and re-packing one or both panniers to get everything to fit. It is also makes it very easy to always carry around an extra spoke or two in the basket.
I could actually use both the basket and my DIY panniers, but I find the basket has more than enough space for almost all trips. Also, if I do over-pack, I can just wear the backpack and put even more stuff in the basket, such as when I go grocery shopping and inevitably buy more things than will fit in my bag. A good accessory for the basket is some type of flexible cargo netting or cover that can hook to the sides of the basket and keeps things from flying or bouncing out.
Here is a close-up of the basket:
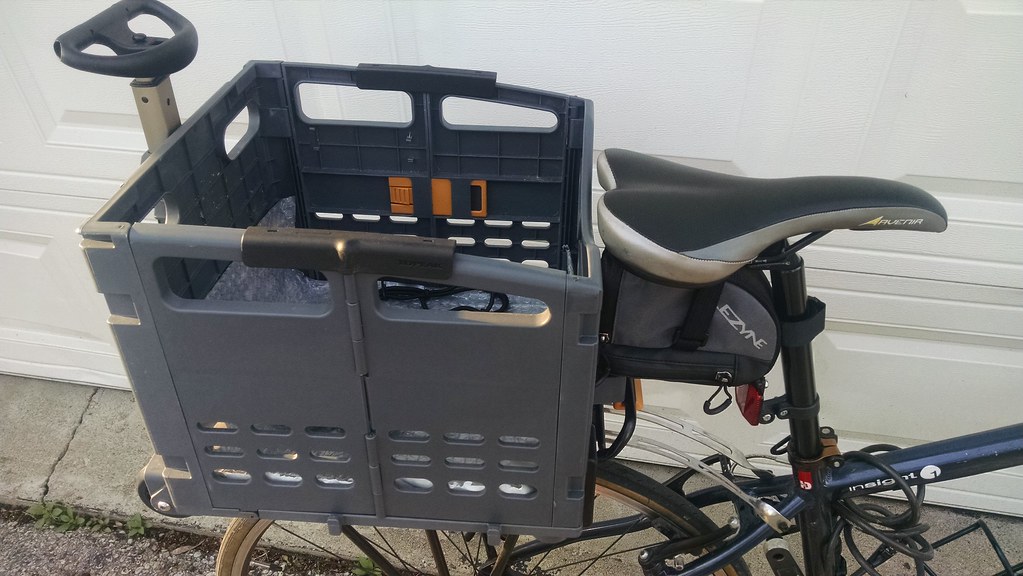
I do a fair amount of transporting groceries, so I put a layer of bubble wrap on the bottom to absorb some of the impact. I have carried five dozen eggs without breaking a single one!
What If Something Goes Wrong?
That’s where the underseat bag comes in. It’s a Lezyne Caddy Saddle Bag, and I use it to carry an extra tube, some Allen wrenches/keys, a spoke wrench, a patch kit, and a set of Pedro’s Tire Levers. I also have a hand pump that attaches to braze-ons on the frame.
The extra tube is definitely worth it so that if you get a flat, you do not have to repair it on the side of the road. Just remove the wheel, swap out the damaged tube for the extra one, inflate it enough to reach your destination using the hand pump, and patch the punctured tube later from the comfort of home.
I also highly recommend the Pedro’s Tire Levers. Before I bought a pair, I used various other tools to remove a tire from the wheel, and nothing I have used before works as well as these. Plus, they make it just as easy to put the tire back on the wheel when you are done!
Going Faster
Once you start riding around your city or town on a regular basis, who doesn’t want to start going faster?
I’ve made a couple upgrades to squeeze out a bit more speed from my bike. First, I replaced the 35c (35mm) tires that came with my bike with 25c (25mm) road tires. This shaved about 10-15% off my commute time to work by allowing to me to consistently pedal one gear faster. The second upgrade I made was investing in a set of SPD clipless pedals and cycling shoes. These further reduced my commute time another 10-15%. Overall, I turned a 40-minute commute into a 30-minute one. Not too bad!
I chose these particular shoes (which I think are technically mountain bike shoes) because I wanted something that I could still walk around in (the cleat on the bottom is recessed within the sole of the shoe). I purchased them in February 2015, and so far both the shoes and the pedals have held up very well. On a side note, (and I’m probably an idiot for not knowing this/not reading the instructions completely ahead of time) should you ever replace your pedals, the pedal on the side of the bike opposite the drive train is reverse-threaded. I have a broken stainless steel wrench as a testament to my ignorance of this fact. How I broke the wrench and not the bike or pedal, I have no idea…
Lights
Yes, get some lights: at a minimum, a white one in front and a red one in back. They will make you much more noticeable than reflectors will. I have people tell me how annoying my front headlight is, even in broad daylight. I tell them that’s exactly what I’m going for :)
My front headlight is a Cygolight Expilion 350. It has several brightness levels as well as a flashing mode. I would definitely recommend it, although it appears that current models are more expensive than I remember this one being.
I am less impressed with my rear light. I bought it because it has the ability to project a “lane” onto the ground behind you like this (not the model I have though). Unfortunately, I went with a cheaper version via EBay. It goes through batteries pretty quickly and the “lane” lights aren’t very bright. It does get the job done for providing a flashing red rear light though.
It never hurts to have additional lights, such as mounted on your helmet, clothing, or wheels. When in doubt, err on the side of being “lit up like a Christmas tree” :) I have heard very good things from friends about Revolights. A little pricey, but you will definitely be seen if you are rolling around town with those on your wheels.
Locks
I lock up my bike using only a measly cable lock. Fortunately, I am able to store my bike in my garage at home and inside the building where I work, so it does not sit out nearly as often as a lot of bikes do.
If I lived in a larger city with more bike theft or had to lock up my bike in public for longer periods of time, I would invest in one or more U-locks. As it is, my bike and gear do not cost that much, and if someone steals it, it will not be the end of the world. If I had a $1000+ bike, I would certainly be taking more precautions.
For me, the cable lock provides just enough deterrence for the small number of times when I leave my bike locked up in a public place somewhere. At some point, I do plan to invest in a higher quality lock.
Additional Resources
Well, there you have it: nearly 2,000 words about my bike and associated gear. To wrap things up, here are some additional resources I found useful as I morphed into a bicycle commuter:
- Miami Valley Trails’ Drive Your Bike: Using Your Bicycle for Transportation
- Ohio Department of Transportation’s Cycling Smarter Guide
- bicycles.stackexchange.com, a Q&A site for people who commute on bicycles (among other things)